As you dive into the world of audio storytelling, one essential tool stands tall as your trusted companion: recording software. This digital ally plays a pivotal role in capturing, refining, and shaping your podcast episodes, from raw audio into a masterpiece.
GarageBand has emerged as one of the most popular and user-friendly podcast recording software options available today. With its intuitive interface and powerful features, GarageBand has become a go-to choice for podcast audio production, for both beginners and seasoned podcasters alike. I guess you’re eager to see how to record a podcast on GarageBand.
In this blog post, we’re going to unlock the potential of GarageBand on your Apple devices, helping you unleash your creativity and share your unique voice with the world. Forget complicated setups and expensive equipment. With just a few taps and swipes, you’ll be well on your way to the podcast production process from the comfort of your couch, coffee shop, or even your favorite park bench!
Get your microphone ready, launch GarageBand, and let your creativity flow as you set out on your podcasting adventure.

Table of Contents
What Is Garageband?
GarageBand is a digital audio workstation (DAW) software developed by Apple. It is available exclusively for Apple devices, so if you have an Apple Computer, iPhone, or iPad, you can take advantage of GarageBand’s features and unleash your creativity.
GarageBand provides users with a user-friendly and intuitive platform for audio recording, editing workflow, music production, and other audio projects. GarageBand has become widely popular among podcasters, thanks to its powerful yet accessible features.
If you’re not a Mac user, try Descript- my recommendation
Why Garageband Is A Perfect Choice?
If you have an Apple device, Garageband will be your reliable and accessible tool for these reasons:
- GarageBand offers podcasters the ability to fine-tune their audio recordings, apply sound effects, and adjust volume levels, providing greater control over the overall sound and quality of their podcasts.
- Extensive Library of Loops and Sound Effects: GarageBand offers an extensive library of royalty-free loops and sound effects, enabling you to add background music, transitions, and soundscapes to your podcast episodes. This helps in creating a polished and professional-sounding production without the need for external resources.
- Import audio files from iTunes and export creations to other Apple applications
- Suitable for music creation, podcaster production, and audio enthusiasts alike
- Allows for high-quality audio production without the need for expensive equipment or extensive training.
One of the drawbacks of GarageBand is its exclusivity to Apple users, it is not available for users of other operating systems such as Windows or Android. This limitation can be frustrating for podcasters who prefer or are required to use non-Apple devices.
Aducaity vs Garageband, are the top 2 popular choices between podcasters, if you don’t use Apple products, you can try Audacity.
How To Record A Podcast On Garageband?
Getting Started
For Mac
- Click on the Launchpad icon in the Dock (the spaceship icon) or locate GarageBand in the Applications folder.
- Double-click on the GarageBand icon to launch the application.
For iPhone/iPad
Locate the GarageBand app on your home screen (usually represented by a guitar icon).
- Tap on the app icon to open GarageBand.
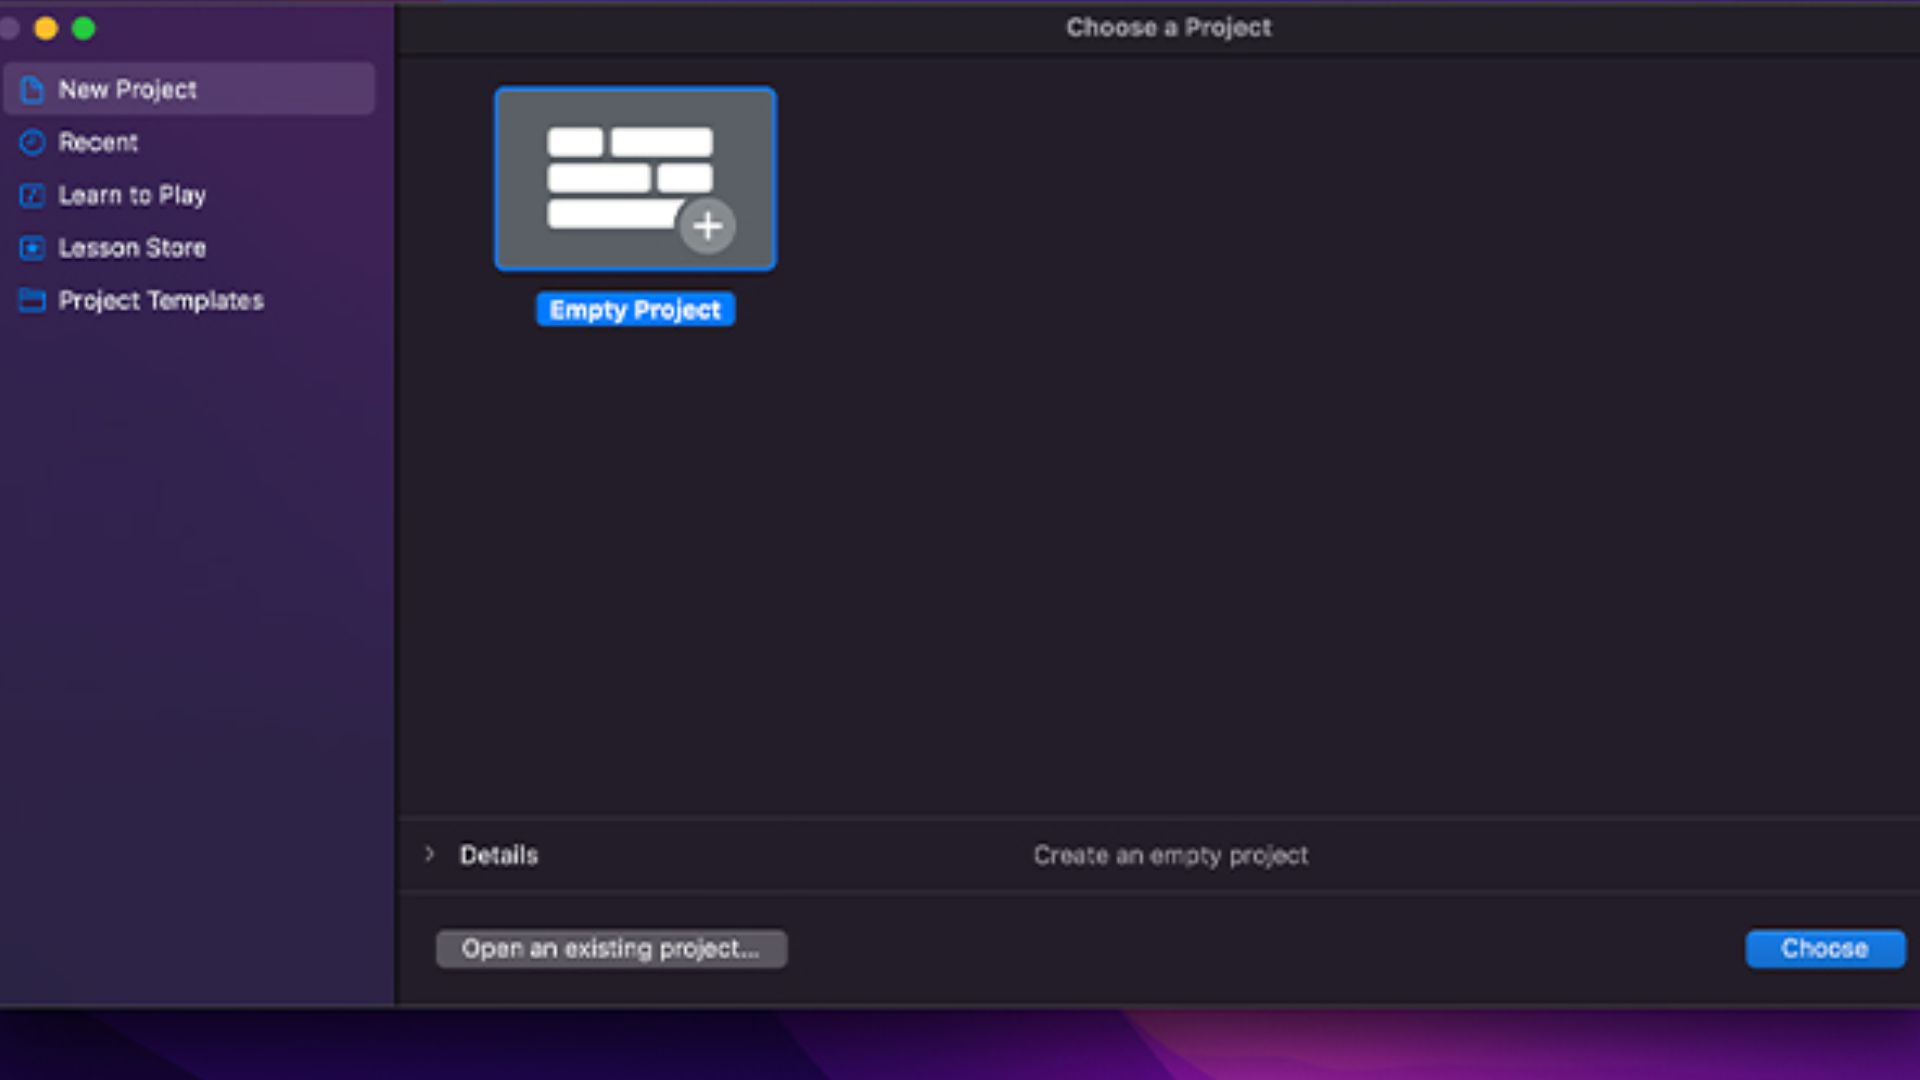
If you are using GarageBand for the first time, you will be prompted to select a new project or template. Choose “Empty Project” from the list of available templates. This option provides a blank canvas for you to create your own GarageBand project.
Set up
Choose the place
Choose a room or area in your home that is relatively quiet and free from distractions and background noise. Consider adding some acoustic treatment to the room to improve the sound quality.
Choose the equipment
Choose high-quality podcast microphones for better audio quality. Ensure that your external microphone is compatible with your device and operating system. Most microphones with a 3.5mm jack or USB connection can be used with GarageBand on your iPhone, iPad, or Mac.
Moreover, you can use an Audio interface or a direct connection (Lightning connector when you’re using an iOS device)
Choose “Microphone” as the track type
In the track selection window, you’ll see various options such as “Audio Recorder,” “Electric Guitar,” “Software Instrument,” etc. Look for the option that says “Microphone” or “Audio Recorder.” Select it to choose a track specifically designed for recording with a microphone.
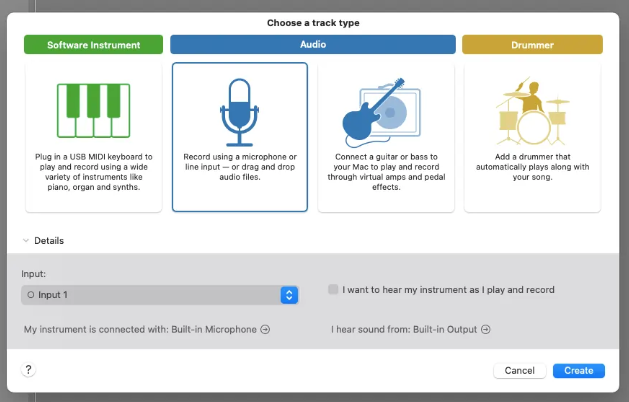
If you’re using multiple microphones for your recording, it’s important to create separate tracks, one for each microphone to ensure proper control and adjustment of the audio levels. This allows you to fine-tune the individual tracks and achieve a balanced mix during the editing process.
If you’re a starter and don’t know how to record a podcast with multiple mics, invest a little time to search for the techniques, as well as different ways to set up multiple microphones.
Choose Preferences
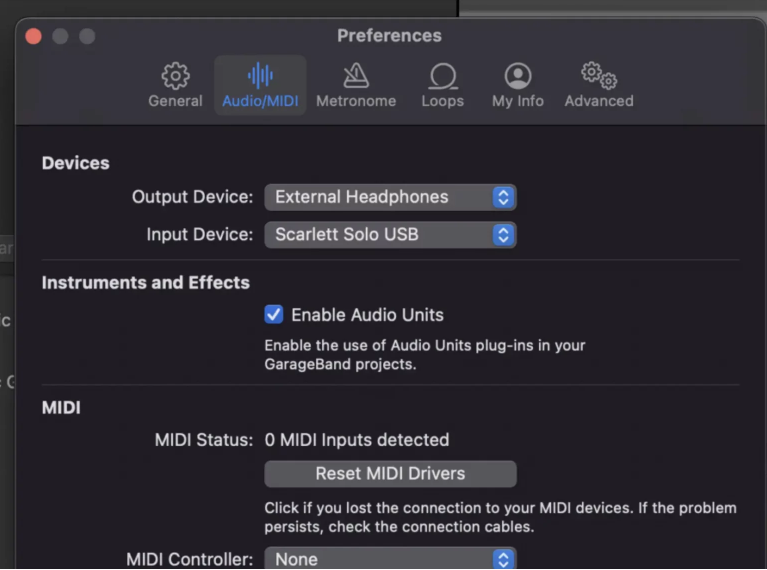
Menu bar -> GarageBand -> From the drop-down menu, select Preferences.
In the Preferences window: click on the “Audio/MIDI” tab. Under the Devices section:
- “Audio Output” option: Make sure it is set to the device you want to use for monitoring, such as headphones or speakers. Select the appropriate output device from the drop-down menu.
- “Audio Input” option: This is where you will select the microphone you want to use for recording your podcast episode. If you’re using the built-in microphone on your computer, select it as the input device.
Once you have selected the correct input and output devices, close the Preferences window.
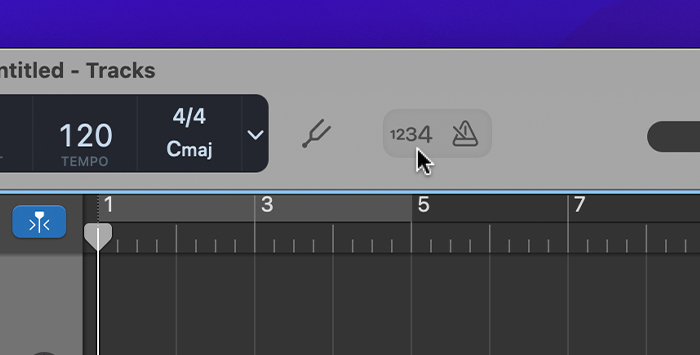
Before you begin recording your podcast in GarageBand, it’s important to ensure that the metronome and count-in features are turned off. These features are primarily used for musical timing and may not be suitable for podcast recordings. The icon will turn gray when it’s disabled
Hit Record-Start your recording session
Once you have completed the setup and configured all the necessary sources and preferences in GarageBand, you are ready to begin your podcast recording.
It’s always a good idea to take a test to check the audio and volume level before you start recording your podcast episode.
For one track recording
To start recording for one track only, simply hit the record button. Begin speaking or performing your podcast content confidently and naturally. Keep an eye on the input level and make sure they stay within the desired range.

For multiple-track recording
When you have more than one person talking, for example, a podcast host and guests, it’s important to record different tracks at the same time to capture their voices separately.
To record on multiple tracks, make sure the tracks are armed for recording.
On the menu bar -> Track -> Configure Track Header
Click the record-enable button (typically a small circle) on each track you want to record on.
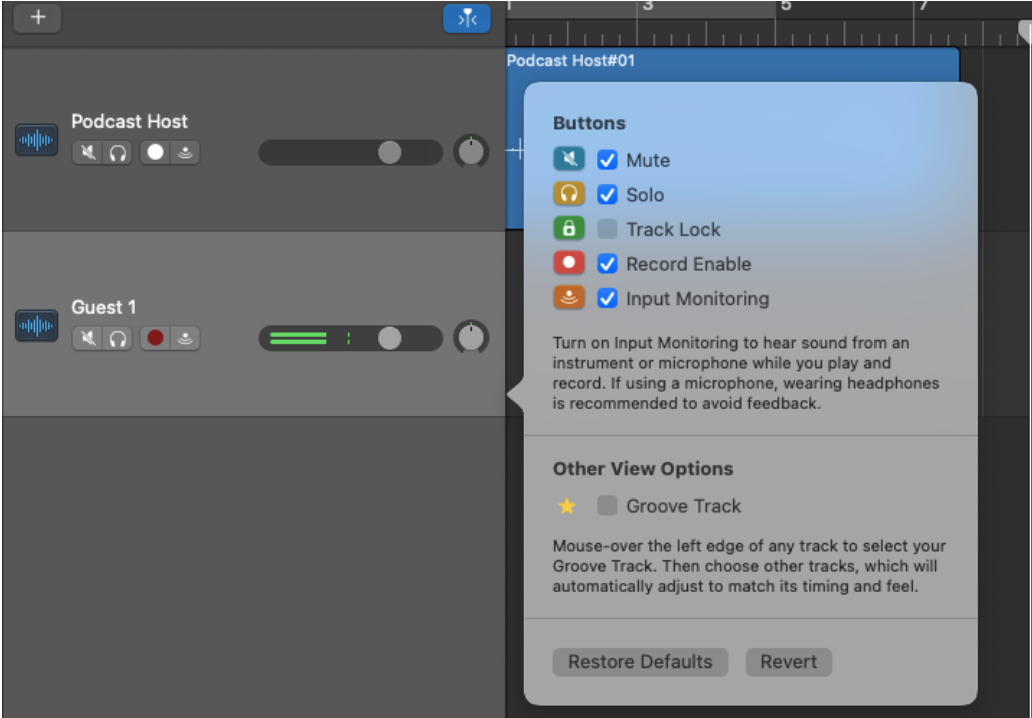
Start the recording by clicking the Record button. All armed tracks will record simultaneously. Remember to turn on the “record enable button” for each track.
Save your audio tracks
Stop and Review: When you have completed your recording or a section of it, click on the square stop button to stop recording. Take a moment to review the full audio file recorded, listening for any issues or areas that may require re-recording.
Save Your Project: Remember to save your project regularly to avoid losing any recorded content. GarageBand will typically prompt you to save when you close the application, but it’s good practice to save periodically during your recording session.
Post-production Process
Edit a podcast in Garageband
Import and arrange your recorded tracks
Open your GarageBand project and navigate to the Tracks view.
Drag and drop your recorded audio tracks onto the timeline.
Use the Track Header to adjust volume levels, and panning, and apply other track-specific settings.
Edit your podcast audio
Zoom in on the timeline to get a more detailed view of your audio.
Trim tool: To enter the trimming mode, click on the scissor icon located at the top left corner of the track header. This will activate the trimming function.
- Trim the Beginning or End
- Trim within the Track
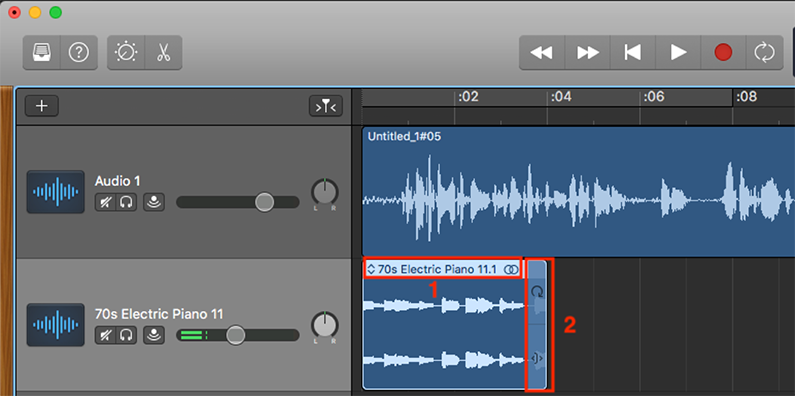
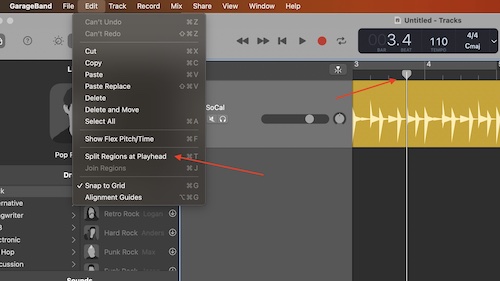
Split tool: a handy feature that allows you to divide your audio track into multiple sections. This tool is especially useful when you want to remove or rearrange specific portions of your podcast episode.
Utilize the Fade In/Out feature to create smooth transitions between sections:
Activate the Automation Button -> Access the Volume Automation -> Choose Fade In or Fade Out
Enhance audio quality
- Apply Equalization (EQ) to adjust the frequency balance and improve clarity.
- Use the Noise Gate to remove background noise during silent sections.
- Apply Compressor to even out volume levels and add consistency.
Add music and sound editing
- Import your background, intro, outro music or theme music by dragging the audio file onto a new track.
- Adjust the volume levels of the music to blend it with the podcast audio.
- Use the Automation feature to control when the music fades in or out.

Export your final podcast:
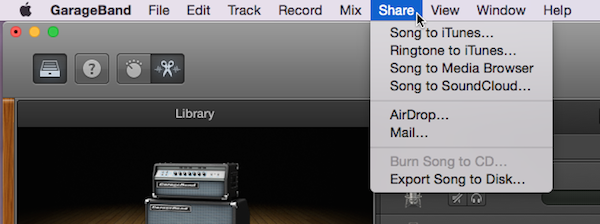
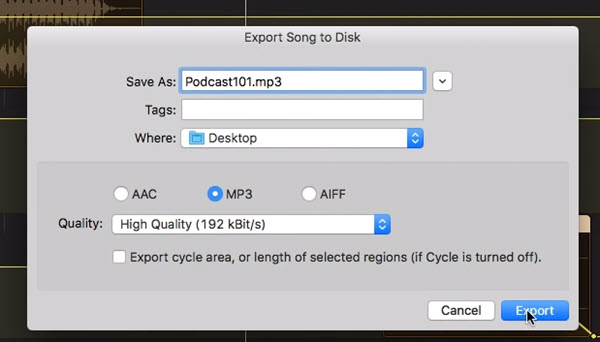
- Go to File > Share > Export Podcast to Disk.
- Choose your desired audio format (MP3, WAV, etc.) and quality settings.
- Specify the file name, location, and metadata (such as podcast title and artist).
- Click Export and wait for GarageBand to render your podcast as a standalone audio file.
Remember to save your GarageBand project file separately to retain the flexibility of making further edits or adjustments in the future. Just equip yourself with the podcast audio file formats knowledge.
Some Tips For A Successful Recording
Prepare your space: Find a quiet environment with minimal noise. Close windows, turn off fans or air conditioning, and silence any potential distractions to ensure a clean recording environment. A podcast studio is an ideal place, you can set it up at home, or hire a studio nearby.
Set up your equipment: Make sure your external microphones are properly connected to your devices. Test your equipment before recording to ensure the volume level is functioning properly. Use other tools like pop filters, and headphones for better sound quality.
Maintain consistent mic technique: Keep a consistent distance from the microphone and maintain a steady position. Avoid sudden movements or tapping on the mic stand, as they can cause unwanted noise.
Take breaks when needed: If you feel your voice becoming strained or fatigued, take short breaks to rest your vocal cords. Hydrate yourself with water to keep your voice sounding fresh.
How To Record A Podcast On Garageband- An Overview
GarageBand is an incredible tool for recording and producing podcasts with ease. This powerful software has everything you need to create professional-quality audio content. From its intuitive interface to its extensive range of features, GarageBand offers a user-friendly experience that empowers you to bring your podcasting dreams to life.
By following the steps and tips outlined in this guide, you’ll be well-equipped to create engaging episodes that captivate your audience.
So, whether you’re sharing stories, educating others, or discussing your passions, GarageBand provides the platform for you to create exceptional podcast episodes. Embrace the journey of podcasting, experiment with different techniques, and let your creativity flourish.
In-person Recording Serive – No More Software’s Complexity
Feeling overwhelmed by the complexities of recording software? Leave the technicalities to us! Our In-Person Recording Service is tailored for those who crave professional results without the software struggles.
Simply provide us with your address, and we’ll address all your recording problems. Our In-Person Recording Service ensures a seamless experience, allowing you to focus on your content while we handle the rest. Click now!

